Showing posts with label Feature Extraction. Show all posts

Discrete Fourier Transform

The Fourier Transform will decompose an image into its sinus and cosines components. It will transform an image from its spatial domain to its frequency domain. Mathematically a two dimensional images Fourier transform is:
F(k,l) = \displaystyle\sum\limits_{i=0}^{N-1}\sum\limits_{j=0}^{N-1} f(i,j)e^{-i2\pi(\frac{ki}{N}+\frac{lj}{N})}

e^{ix} = \cos{x} + i\sin {x}

Here f is the image value in its spatial domain and F in its frequency domain. The result of the transformation is complex numbers.

dft Performs a forward or inverse Discrete Fourier transform of a 1D or 2D floating-point array.

void dft(InputArray src, OutputArray dst, int flags=0, int nonzeroRows=0)

Parameters:
  • src – input array that could be real or complex.
  • dst – output array whose size and type depends on the flags .
  • flags – transformation flags, representing a combination of the following values:
    • DFT_INVERSE performs an inverse 1D or 2D transform instead of the default forward transform.
    • DFT_SCALE scales the result: divide it by the number of array elements. Normally, it is combined with DFT_INVERSE.
    • DFT_ROWS performs a forward or inverse transform of every individual row of the input matrix; this flag enables you to transform multiple vectors simultaneously and can be used to decrease the overhead (which is sometimes several times larger than the processing itself) to perform 3D and higher-dimensional transformations and so forth.
    • DFT_COMPLEX_OUTPUT performs a forward transformation of 1D or 2D real array; the result, though being a complex array, has complex-conjugate symmetry (CCS, see the function description below for details), and such an array can be packed into a real array of the same size as input, which is the fastest option and which is what the function does by default; however, you may wish to get a full complex array (for simpler spectrum analysis, and so on) - pass the flag to enable the function to produce a full-size complex output array.
    • DFT_REAL_OUTPUT performs an inverse transformation of a 1D or 2D complex array; the result is normally a complex array of the same size, however, if the input array has conjugate-complex symmetry (for example, it is a result of forward transformation with DFT_COMPLEX_OUTPUT flag), the output is a real array; while the function itself does not check whether the input is symmetrical or not, you can pass the flag and then the function will assume the symmetry and produce the real output array (note that when the input is packed into a real array and inverse transformation is executed, the function treats the input as a packed complex-conjugate symmetrical array, and the output will also be a real array).
  • nonzeroRows – when the parameter is not zero, the function assumes that only the first nonzeroRows rows of the input array (DFT_INVERSE is not set) or only the first nonzeroRows of the output array (DFT_INVERSE is set) contain non-zeros, thus, the function can handle the rest of the rows more efficiently and save some time; this technique is very useful for calculating array cross-correlation or convolution using DFT.
void idft(InputArray src, OutputArray dst, int flags=0, int nonzeroRows=0)

Parameters:
  • src – input floating-point real or complex array.
  • dst – output array whose size and type depend on the flags.
  • flags – operation flags (same as dft()).
  • nonzeroRows – number of dst rows to process; the rest of the rows have undefined content

Example 1:

------------
#include "opencv2/highgui/highgui.hpp"
#include <iostream>

using namespace std;
using namespace cv;

int main()
{
    // Read image from file
    // Make sure that the image is in grayscale
    Mat img = imread("lena.JPG",0);
    
    Mat planes[] = {Mat_<float>(img), Mat::zeros(img.size(), CV_32F)};
    Mat complexI;    //Complex plane to contain the DFT coefficients {[0]-Real,[1]-Img}
    merge(planes, 2, complexI);
    dft(complexI, complexI);  // Applying DFT

    // Reconstructing original imae from the DFT coefficients
    Mat invDFT, invDFTcvt;
    idft(complexI, invDFT, DFT_SCALE | DFT_REAL_OUTPUT ); // Applying IDFT
    invDFT.convertTo(invDFTcvt, CV_8U); 
    imshow("Output", invDFTcvt);

    //show the image
    imshow("Original Image", img);
    
    // Wait until user press some key
    waitKey(0);
    return 0;
}
------------

Example 2:

------------
#include "opencv2/highgui/highgui.hpp"
#include <iostream>

using namespace std;
using namespace cv;

int main()
{
    // Read image from file
    // Make sure that the image is in grayscale
    Mat img = imread("lena.JPG",0);

    Mat dftInput1, dftImage1, inverseDFT, inverseDFTconverted;
    img.convertTo(dftInput1, CV_32F);
    dft(dftInput1, dftImage1, DFT_COMPLEX_OUTPUT);    // Applying DFT

    // Reconstructing original imae from the DFT coefficients
    idft(dftImage1, inverseDFT, DFT_SCALE | DFT_REAL_OUTPUT ); // Applying IDFT
    inverseDFT.convertTo(inverseDFTconverted, CV_8U);
    imshow("Output", inverseDFTconverted);

    //show the image
    imshow("Original Image", img);
    
    // Wait until user press some key
    waitKey(0);
    return 0;
}
------------

Sources:
http://docs.opencv.org/modules/core/doc/operations_on_arrays.html#void%20dft%28InputArray%20src,%20OutputArray%20dst,%20int%20flags,%20int%20nonzeroRows%29

http://docs.opencv.org/doc/tutorials/core/discrete_fourier_transform/discrete_fourier_transform.html

Histogram Equalization

void equalizeHist(InputArray src, OutputArray dst)
Parameters:
  • src – Source 8-bit single channel image.
  • dst – Destination image of the same size and type as src .

Example:

----------
#include "opencv2/core/core.hpp"
#include "opencv2/highgui/highgui.hpp"
#include "opencv2/imgproc/imgproc.hpp"
#include "iostream"

using namespace cv;
using namespace std;

int main( )
{
 Mat src1;
 src1 = imread("lena.jpg", CV_LOAD_IMAGE_COLOR);
 
 Mat gray, dst;

 // convert to gray
 cvtColor(src1, gray, CV_BGR2GRAY);
 namedWindow( "Original image", CV_WINDOW_AUTOSIZE );
 imshow( "Original image", gray );

 // hisogram equalization
 equalizeHist( gray, dst );

 namedWindow("image", CV_WINDOW_AUTOSIZE);
 imshow("image", dst);

 waitKey(0);                                       
 return 0;
}
----------

Result:


Select a region on mouse click

The following program allows the user to select a point on the image and extracts the region around that point, from which it extracts information such as mean and variance of the locality.

void setMouseCallback(const string& winname, MouseCallback onMouse, void* userdata=0 )
- Sets mouse handler for the specified window
Parameters:
  • winname – Window name
  • onMouse – Mouse callback.
  • userdata – The optional parameter passed to the callback.

Example:

-----------
#include "opencv2/opencv.hpp"
#include<cmath>
#include "iostream"

using namespace cv;
using namespace std;

int var1=1;
Point pos;
int radius = 7;

void CallBackFunc(int event, int x, int y, int flags, void* userdata)
{
    if  ( event == EVENT_LBUTTONDOWN )
    {
        pos.x=x;
        pos.y=y;
        var1=0;
    }
}


int main(int, char**)
{
    VideoCapture cap(0); // open the default camera
    if(!cap.isOpened())  // check if we succeeded
        return -1;

    namedWindow("Video",1);    
    int area = (2*radius+1)*(2*radius+1);
    
    Mat frame;        

    //select the region on the image
    while(var1==1)
    {
        //set the callback function for any mouse event
        setMouseCallback("Video", CallBackFunc, NULL);

        cap >> frame;         // get a new frame from camera
        //show the image
        imshow("Video", frame);

        // Wait until user press some key
        waitKey(10);    
    }
        
    GaussianBlur( frame, frame, Size( 15, 15 ), 0, 0 );imshow("blur",frame);
    Mat imgHSV,out;
    cvtColor(frame, imgHSV, CV_BGR2HSV);    imshow("HSV",imgHSV);
    Mat final;
    final = frame;

    float blue=0, green=0,red=0, b_var=0, g_var=0, r_var=0;
    for(int var2=pos.y-radius;var2<=pos.y+radius;var2++)
        for(int var3=pos.x-radius;var3<=pos.x+radius;var3++)
        {
            Vec3b intensity = final.at<Vec3b>(var2,var3);   
            blue = blue + intensity.val[0];
            green = green + intensity.val[1];
            red = red + intensity.val[2];
        }
    red=red/area; green=green/area; blue=blue/area;

    for(int var2=pos.y-radius;var2<=pos.y+radius;var2++)
        for(int var3=pos.x-radius;var3<=pos.x+radius;var3++)
        {
            Vec3b intensity = final.at<Vec3b>(var2,var3);   
            b_var = b_var + (intensity.val[0]-blue)*(intensity.val[0]-blue);
            g_var = g_var + (intensity.val[1]-green)*(intensity.val[1]-green);
            r_var = r_var + (intensity.val[2]-red)*(intensity.val[2]-red);
        }    
    
    r_var/=area; g_var/=area; b_var/=area;
    r_var=sqrt(r_var); g_var=sqrt(g_var); b_var=sqrt(b_var);
    cout<<red<<" "<<green<<"  "<<blue<<" "<<r_var<<" "<<g_var<<" "<<b_var;


    inRange(final,Scalar(blue-b_var,green-g_var,red-r_var),Scalar(blue+b_var,green+g_var,red+r_var),out);imshow("out",out);

    waitKey(0);
    return 0;
}
-----------

Convex Hull

X is a bounded subset of the plane, the convex hull may be visualized as the shape formed by a rubber band stretched around X.
The convex hull of a set X of points in the Euclidean plane is the smallest convex set that contains X. when
Formally, the convex hull may be defined as the intersection of all convex sets containing X or as the set of all convex combinations of points in X.
A set of points is defined to be convex if it contains the line segments connecting each pair of its points. The convex hull of a given set X may be defined as
  1. The (unique) minimal convex set containing X
  2. The intersection of all convex sets containing X
  3. The set of all convex combinations of points in X.

void convexHull(InputArray points, OutputArray hull, bool clockwise=false, bool returnPoints=true )

Parameters:
  • points – Input 2D point set, stored in std::vector or Mat.
  • hull – Output convex hull. It is either an integer vector of indices or vector of points. In the first case, the hull elements are 0-based indices of the convex hull points in the original array (since the set of convex hull points is a subset of the original point set). In the second case, hull elements are the convex hull points themselves.
  • hull_storage – Output memory storage in the old API (cvConvexHull2 returns a sequence containing the convex hull points or their indices).
  • clockwise – Orientation flag. If it is true, the output convex hull is oriented clockwise. Otherwise, it is oriented counter-clockwise. The assumed coordinate system has its X axis pointing to the right, and its Y axis pointing upwards.
  • orientation – Convex hull orientation parameter in the old API, CV_CLOCKWISE or CV_COUNTERCLOCKWISE.
  • returnPoints – Operation flag. In case of a matrix, when the flag is true, the function returns convex hull points. Otherwise, it returns indices of the convex hull points. When the output array is std::vector, the flag is ignored, and the output depends on the type of the vector: std::vector<int> implies returnPoints=true, std::vector<Point> implies returnPoints=false.
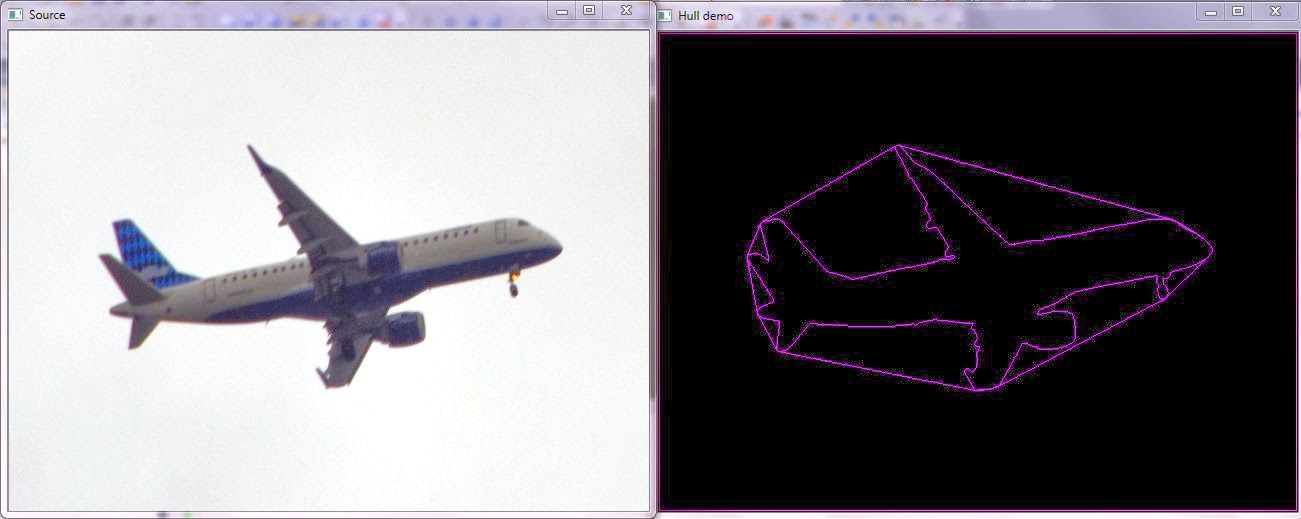
A good example for Convex Hull implementation is provided in OpenCV Documentation. Below code is a modification of the same.

Example:

------------
#include "opencv2/highgui/highgui.hpp"
#include "opencv2/imgproc/imgproc.hpp"
#include <iostream>
#include <stdio.h>
#include <stdlib.h>

using namespace cv;
using namespace std;

int main( int argc, char** argv )
{
 Mat src; Mat src_gray;
 src = imread( "airplane1.jpg", 1 );
 resize(src, src, Size(640,480), 0, 0, INTER_CUBIC);
 cvtColor( src, src_gray, CV_BGR2GRAY );
 blur( src_gray, src_gray, Size(3,3) ); 
 namedWindow( "Source", CV_WINDOW_AUTOSIZE );
 imshow( "Source", src );


 // Convex Hull implementation
 Mat src_copy = src.clone();
 Mat threshold_output;
 vector<vector<Point> > contours;
 vector<Vec4i> hierarchy;

 // Find contours
 threshold( src_gray, threshold_output, 200, 255, THRESH_BINARY );
 findContours( threshold_output, contours, hierarchy, CV_RETR_TREE, CV_CHAIN_APPROX_SIMPLE, Point(0, 0) );

 // Find the convex hull object for each contour
 vector<vector<Point> >hull( contours.size() );
 for( int i = 0; i < contours.size(); i++ )
 {  convexHull( Mat(contours[i]), hull[i], false ); }

 // Draw contours + hull results
 RNG rng;
 Mat drawing = Mat::zeros( threshold_output.size(), CV_8UC3 );
 for( int i = 0; i< contours.size(); i++ )
 {
  Scalar color = Scalar( rng.uniform(0, 255), rng.uniform(0,255), rng.uniform(0,255) );
  drawContours( drawing, contours, i, color, 1, 8, vector<Vec4i>(), 0, Point() );
  drawContours( drawing, hull, i, color, 1, 8, vector<Vec4i>(), 0, Point() );
 }

 // Show in a window
 namedWindow( "Hull demo", CV_WINDOW_AUTOSIZE );
 imshow( "Hull demo", drawing );

 waitKey(0);
 return(0);
}
------------

Result:

Sources:
http://en.wikipedia.org/wiki/Convex_hull

Face Detection using Haar-Cascade Classifier

class CascadeClassifier - Cascade classifier class for object detection

CascadeClassifier::CascadeClassifier(const string& filename) // Constructor - Loads a classifier from a file
CascadeClassifier face_cascade( "C:/OpenCV243/data/Haarcascades/haarcascade_frontalface_alt2.xml" );

bool CascadeClassifier::empty() const // Checks whether the classifier has been loaded.bool CascadeClassifier::load(const string& filename) // Loads a classifier from a file
CascadeClassifier face_cascade;
face_cascade.load( "C:/OpenCV243/data/Haarcascades/haarcascade_frontalface_alt2.xml" ); 

bool CascadeClassifier::read(const FileNode& node) // Reads a classifier from a FileStorage node


void CascadeClassifier::detectMultiScale(const Mat& image, vector<Rect>& objects, double scaleFactor=1.1, int minNeighbors=3, int flags=0, Size minSize=Size(), Size maxSize=Size())
// Detects objects of different sizes in the input image.
// The detected objects are returned as a list of rectangles.

Parameters:   
  • cascade – Haar classifier cascade (OpenCV 1.x API only). It can be loaded from XML or YAML file using Load(). When the cascade is not needed anymore, release it using cvReleaseHaarClassifierCascade(&cascade).
  • image – Matrix of the type CV_8U containing an image where objects are detected.
  • objects – Vector of rectangles where each rectangle contains the detected object.
  • scaleFactor – Parameter specifying how much the image size is reduced at each image scale.
  • minNeighbors – Parameter specifying how many neighbors each candidate rectangle should have to retain it.
  • flags – Parameter with the same meaning for an old cascade as in the function cvHaarDetectObjects. It is not used for a new cascade.
  • minSize – Minimum possible object size. Objects smaller than that are ignored.
  • maxSize – Maximum possible object size. Objects larger than that are ignored.
bool CascadeClassifier::setImage(Ptr<FeatureEvaluator>& feval, const Mat& image)
// Sets an image for detection
Parameters:
  • cascade – Haar classifier cascade (OpenCV 1.x API only). See CascadeClassifier::detectMultiScale() for more information.
  • feval – Pointer to the feature evaluator used for computing features.
  • image – Matrix of the type CV_8UC1 containing an image where the features are computed
int CascadeClassifier::runAt(Ptr<FeatureEvaluator>& feval, Point pt, double& weight)
// Runs the detector at the specified point. The function returns 1 if the cascade classifier detects an object in the given location. Otherwise, it returns negated index of the stage at which the candidate has been rejected.
Parameters:
  • cascade – Haar classifier cascade (OpenCV 1.x API only). See CascadeClassifier::detectMultiScale() for more information.
  • feval – Feature evaluator used for computing features.
  • pt – Upper left point of the window where the features are computed. Size of the window is equal to the size of training images.

Steps:

  1. Read the image.
  2. Load Face cascade (CascadeClassifier > load)
  3. Detect faces (detectMultiScale)
  4. Draw circles on the detected faces (ellipse)
  5. Show the result.

Functions:


Example:

------------
#include "opencv2/objdetect/objdetect.hpp"
#include "opencv2/highgui/highgui.hpp"
#include "opencv2/imgproc/imgproc.hpp"

#include <iostream>
#include <stdio.h>

using namespace std;
using namespace cv;

int main( )
{
    Mat image;
    image = imread("lena.jpg", CV_LOAD_IMAGE_COLOR);  
    namedWindow( "window1", 1 );   imshow( "window1", image );

    // Load Face cascade (.xml file)
    CascadeClassifier face_cascade;
    face_cascade.load( "C:/OpenCV243/data/Haarcascades/haarcascade_frontalface_alt2.xml" );

    // Detect faces
    std::vector<Rect> faces;
    face_cascade.detectMultiScale( image, faces, 1.1, 2, 0|CV_HAAR_SCALE_IMAGE, Size(30, 30) );

    // Draw circles on the detected faces
    for( int i = 0; i < faces.size(); i++ )
    {
        Point center( faces[i].x + faces[i].width*0.5, faces[i].y + faces[i].height*0.5 );
        ellipse( image, center, Size( faces[i].width*0.5, faces[i].height*0.5), 0, 0, 360, Scalar( 255, 0, 255 ), 4, 8, 0 );
    }
    
    imshow( "Detected Face", image );
    
    waitKey(0);                   
    return 0;
}
------------

Fitting rotated boxes and ellipses for contours

RotatedRect fitEllipse(InputArray points)
Fits an ellipse around a set of 2D points.

RotatedRect minAreaRect(InputArray points)
Finds a rotated rectangle of the minimum area enclosing the input 2D point set.

vector<vector<Point>> contours;
findContours( ..., contours, ...); // This will find out the contours and save in contours
cout<<endl<<Mat(contours[index])<<endl; //index = 0,1,2,... used to print the format of contours
ellipse = fitEllipse( Mat(contours[i]) ); // fitting ellipse in contour points
Rect = minAreaRect( Mat(contours[i]) ); 
 
The code provided below is slight modification of code given in OpenCV documentation.

Steps:

  1. Load image
  2. Convert to gray-scale.
  3. Remove noise by blurring with a Gaussian filter
  4. Create new window
  5. Add trackbar to the window
  • Detect Canny edges
  • Find contours
  • Find the rotated rectangles and ellipses for each contour
  • Draw contours, rotated rectangles and ellipses

Functions:


Example:

-----------------
#include "opencv2/imgproc/imgproc.hpp"
#include "opencv2/highgui/highgui.hpp"
#include <stdlib.h>
#include <stdio.h>
#include<iostream>

using namespace cv;
using namespace std;

Mat src; Mat src_gray;
int thresh = 73;
int points = 50;
int max_thresh = 255;
RNG rng(12345);

void thresh_callback(int, void*);

int main( )
{
    /// Load source image and convert it to gray
    src = imread( "1.jpg", 1 );

    /// Convert image to gray and blur it
    cvtColor( src, src_gray, CV_BGR2GRAY );
    blur( src_gray, src_gray, Size(3,3) );

    namedWindow( "Source", CV_WINDOW_AUTOSIZE );    imshow( "Source", src );
    createTrackbar( " Threshold:", "Source", &thresh, max_thresh, thresh_callback );
    
    namedWindow( "Source1", CV_WINDOW_AUTOSIZE );    imshow( "Source1", src );
    createTrackbar( " Threshold:", "Source1", &points, max_thresh, thresh_callback );

    thresh_callback(0,0);

    waitKey(0);
    return(0);
}

void thresh_callback( int, void*)
{
    Mat threshold_output;
    Mat edge;
    vector<vector<Point> > contours;
    vector<Vec4i> hierarchy;

    /// Detect edges     
    Canny( src_gray, edge, thresh, 3*thresh, 3);
    edge.convertTo(threshold_output, CV_8U);

    /// Find contours
    findContours( threshold_output, contours, hierarchy, CV_RETR_TREE, CV_CHAIN_APPROX_SIMPLE, Point(0, 0) );

    /// Find the rotated rectangles and ellipses for each contour
    vector<RotatedRect> minRect( contours.size() );
    vector<RotatedRect> minEllipse( contours.size() );
    
    cout<<endl<<contours[1]<<endl;
    cout<<endl<<Mat(contours[1])<<endl;

    for( int i = 0; i < contours.size(); i++ )
    { minRect[i] = minAreaRect( Mat(contours[i]) );
    if( contours[i].size() > points )
    { minEllipse[i] = fitEllipse( Mat(contours[i]) ); }
    }

    /// Draw contours + rotated rects + ellipses
    Mat drawing = Mat::zeros( threshold_output.size(), CV_8UC3 );
    for( int i = 0; i< contours.size(); i++ )
    {
        Scalar color = Scalar( rng.uniform(0, 255), rng.uniform(0,255), rng.uniform(0,255) );
        // contour
        drawContours( drawing, contours, i, color, 1, 8, vector<Vec4i>(), 0, Point() );
        // ellipse
        ellipse( drawing, minEllipse[i], color, 2, 8 );
        // rotated rectangle
        Point2f rect_points[4]; minRect[i].points( rect_points );
        for( int j = 0; j < 4; j++ )
            line( drawing, rect_points[j], rect_points[(j+1)%4], color, 1, 8 );
    }

    /// Show in a window
    namedWindow( "Contours", CV_WINDOW_AUTOSIZE );
    imshow( "Contours", drawing );
}
-----------------

Result:


Calculating moments of an image

Moments moments(InputArray array, bool binaryImage=false )

Parameters:
  • array – Raster image (single-channel, 8-bit or floating-point 2D array) or an array ( 1xN or Nx1 ) of 2D points (Point or Point2f ).
  • binaryImage – If it is true, all non-zero image pixels are treated as 1’s. The parameter is used for images only.
  • moments – Output moments.
The function computes moments, up to the 3rd order, of a vector shape or a rasterized shape. The results are returned in the structure Moments defined as:
class Moments
{
public:
    Moments();
    Moments(double m00, double m10, double m01, double m20, double m11,
            double m02, double m30, double m21, double m12, double m03 );
    Moments( const CvMoments& moments );
    operator CvMoments() const;

    // spatial moments
    double  m00, m10, m01, m20, m11, m02, m30, m21, m12, m03;
    // central moments
    double  mu20, mu11, mu02, mu30, mu21, mu12, mu03;
    // central normalized moments
    double  nu20, nu11, nu02, nu30, nu21, nu12, nu03;
}
In case of a raster image, the spatial moments Moments:: mji are computed as:
\texttt{m} _{ji}= \sum _{x,y}  \left ( \texttt{array} (x,y)  \cdot x^j  \cdot y^i \right )
The central moments \texttt{Moments::mu}_{ji} are computed as:
\texttt{mu} _{ji}= \sum _{x,y}  \left ( \texttt{array} (x,y)  \cdot (x -  \bar{x} )^j  \cdot (y -  \bar{y} )^i \right )
where (\bar{x}, \bar{y}) is the mass center:
\bar{x} = \frac{\texttt{m}_{10}}{\texttt{m}_{00}} , \; \bar{y} = \frac{\texttt{m}_{01}}{\texttt{m}_{00}}
The normalized central moments Moments:: nuji are computed as:
\texttt{nu} _{ji}= \frac{\texttt{mu}_{ji}}{\texttt{m}_{00}^{(i+j)/2+1}} .
The code provided below is slight modification of code given in OpenCV documentation.

Steps:

  1. Load image
  2. Convert to gray-scale.
  3. Remove noise by blurring with a Gaussian filter
  4. Detect edges using canny
  5. Find contours (findContours)
  6. Get the moments(Moments)
  7. Draw contours 
  8. Calculate the area with the moments 00 and compare with the result of the OpenCV function

Functions:


Example:

-------------
#include "opencv2/highgui/highgui.hpp"
#include "opencv2/imgproc/imgproc.hpp"
#include <iostream>
#include <stdio.h>
#include <stdlib.h>

using namespace cv;
using namespace std;


RNG rng(12345);

void find_moments( Mat src );

int main( )
{
    /// Load source image, convert it to gray and blur it
    Mat src, gray;;
    src = imread("shapes.jpg", 1 );
    cvtColor( src, gray, CV_BGR2GRAY );
    blur( gray, gray, Size(3,3) );

    namedWindow( "Source", CV_WINDOW_AUTOSIZE );
    imshow( "Source", src );

    find_moments( gray );

    waitKey(0);
    return(0);
}

void find_moments( Mat gray )
{
    Mat canny_output;
    vector<vector<Point> > contours;
    vector<Vec4i> hierarchy;

    /// Detect edges using canny
    Canny( gray, canny_output, 50, 150, 3 );
    /// Find contours
    findContours( canny_output, contours, hierarchy, CV_RETR_TREE, CV_CHAIN_APPROX_SIMPLE, Point(0, 0) );

    /// Get the moments
    vector<Moments> mu(contours.size() );
    for( int i = 0; i < contours.size(); i++ )
    { mu[i] = moments( contours[i], false ); }

    ///  Get the mass centers:
    vector<Point2f> mc( contours.size() );
    for( int i = 0; i < contours.size(); i++ )
    { mc[i] = Point2f( mu[i].m10/mu[i].m00 , mu[i].m01/mu[i].m00 ); }

    /// Draw contours
    Mat drawing = Mat::zeros( canny_output.size(), CV_8UC3 );
    for( int i = 0; i< contours.size(); i++ )
    {
        Scalar color = Scalar( rng.uniform(0, 255), rng.uniform(0,255), rng.uniform(0,255) );
        drawContours( drawing, contours, i, color, 2, 8, hierarchy, 0, Point() );
        circle( drawing, mc[i], 4, color, -1, 8, 0 );
    }

    /// Show in a window
    namedWindow( "Contours", CV_WINDOW_AUTOSIZE );
    imshow( "Contours", drawing );

    /// Calculate the area with the moments 00 and compare with the result of the OpenCV function
    printf("\t Info: Area and Contour Length \n");
    for( int i = 0; i< contours.size(); i++ )
        printf(" * Contour[%d] - Area (M_00) = %.2f - Area OpenCV: %.2f - Length: %.2f \n", i, mu[i].m00, contourArea(contours[i]), arcLength( contours[i], true ) );

}
-------------

Find Contour

void findContours(InputOutputArray image, OutputArrayOfArrays contours, OutputArray hierarchy, int mode, int method, Point offset=Point())

Parameters:
  • image – Source, an 8-bit single-channel image. Non-zero pixels are treated as 1’s. Zero pixels remain 0’s, so the image is treated as binary . You can use compare() , inRange() , threshold() , adaptiveThreshold() , Canny() , and others to create a binary image out of a grayscale or color one. The function modifies the image while extracting the contours.
  • contours – Detected contours. Each contour is stored as a vector of points.
  • hierarchy – Optional output vector, containing information about the image topology. It has as many elements as the number of contours. For each i-th contour contours[i] , the elements hierarchy[i][0] , hiearchy[i][1] , hiearchy[i][2] , and hiearchy[i][3] are set to 0-based indices in contours of the next and previous contours at the same hierarchical level, the first child contour and the parent contour, respectively. If for the contour i there are no next, previous, parent, or nested contours, the corresponding elements of hierarchy[i] will be negative.
  • mode – Contour retrieval mode (if you use Python see also a note below).
    • CV_RETR_EXTERNAL retrieves only the extreme outer contours. It sets hierarchy[i][2]=hierarchy[i][3]=-1 for all the contours.
    • CV_RETR_LIST retrieves all of the contours without establishing any hierarchical relationships.
    • CV_RETR_CCOMP retrieves all of the contours and organizes them into a two-level hierarchy. At the top level, there are external boundaries of the components. At the second level, there are boundaries of the holes. If there is another contour inside a hole of a connected component, it is still put at the top level.
    • CV_RETR_TREE retrieves all of the contours and reconstructs a full hierarchy of nested contours. This full hierarchy is built and shown in the OpenCV contours.c demo.
  • method – Contour approximation method (if you use Python see also a note below).
    • CV_CHAIN_APPROX_NONE stores absolutely all the contour points. That is, any 2 subsequent points (x1,y1) and (x2,y2) of the contour will be either horizontal, vertical or diagonal neighbors, that is, max(abs(x1-x2),abs(y2-y1))==1.
    • CV_CHAIN_APPROX_SIMPLE compresses horizontal, vertical, and diagonal segments and leaves only their end points. For example, an up-right rectangular contour is encoded with 4 points.
    • CV_CHAIN_APPROX_TC89_L1,CV_CHAIN_APPROX_TC89_KCOS applies one of the flavors of the Teh-Chin chain approximation algorithm. 
  • offset – Optional offset by which every contour point is shifted. This is useful if the contours are extracted from the image ROI and then they should be analyzed in the whole image context.

void drawContours(InputOutputArray image, InputArrayOfArrays contours, int contourIdx, const Scalar& color, int thickness=1, int lineType=8, InputArray hierarchy=noArray(), int maxLevel=INT_MAX, Point offset=Point() )

Parameters:
  • image – Destination image.
  • contours – All the input contours. Each contour is stored as a point vector.
  • contourIdx – Parameter indicating a contour to draw. If it is negative, all the contours are drawn.
  • color – Color of the contours.
  • thickness – Thickness of lines the contours are drawn with. If it is negative (for example, thickness=CV_FILLED ), the contour interiors are drawn.
  • lineType – Line connectivity. See line() for details.
  • hierarchy – Optional information about hierarchy. It is only needed if you want to draw only some of the contours (see maxLevel ).
  • maxLevel – Maximal level for drawn contours. If it is 0, only the specified contour is drawn. If it is 1, the function draws the contour(s) and all the nested contours. If it is 2, the function draws the contours, all the nested contours, all the nested-to-nested contours, and so on. This parameter is only taken into account when there is hierarchy available.
  • offset – Optional contour shift parameter. Shift all the drawn contours by the specified \texttt{offset}=(dx,dy) .
  • contour – Pointer to the first contour.
  • externalColor – Color of external contours.
  • holeColor – Color of internal contours (holes)

Steps:

  1. Load an image 
  2. Create a structuring element
  3. Apply erosion or dilation on the image
  4. Show result

Functions:

Example 1:Find Contour OpenCV documentation implementation

-------------
#include "opencv2/core/core.hpp"
#include "opencv2/highgui/highgui.hpp"
#include "opencv2/imgproc/imgproc.hpp"
#include "iostream"
using namespace cv;
using namespace std;
int main( )
{
    Mat image;
    image = imread("shape.jpg", 1);  
    namedWindow( "Display window", CV_WINDOW_AUTOSIZE );  
    imshow( "Display window", image );
    Mat gray;
    cvtColor(image, gray, CV_BGR2GRAY);
    Canny(gray, gray, 100, 200, 3);
    /// Find contours   
    vector<vector<Point> > contours;
    vector<Vec4i> hierarchy;
    RNG rng(12345);
    findContours( gray, contours, hierarchy, CV_RETR_TREE, CV_CHAIN_APPROX_SIMPLE, Point(0, 0) );
    /// Draw contours
    Mat drawing = Mat::zeros( gray.size(), CV_8UC3 );
    for( int i = 0; i< contours.size(); i++ )
    {
        Scalar color = Scalar( rng.uniform(0, 255), rng.uniform(0,255), rng.uniform(0,255) );
        drawContours( drawing, contours, i, color, 2, 8, hierarchy, 0, Point() );
    }     

    imshow( "Result window", drawing );
    waitKey(0);                                         
    return 0;
}
-------------

 Result:


Example 2: Find Largest contour

-------------
#include "opencv2/core/core.hpp"
#include "opencv2/highgui/highgui.hpp""
#include "opencv2/imgproc/imgproc.hpp"
#include "iostream"
using namespace cv;
using namespace std;
int main( )
{
    Mat src;
    src = imread("shape.jpg", CV_LOAD_IMAGE_COLOR);
    Mat gray;
    cvtColor(src, gray, CV_BGR2GRAY);
    threshold(gray, gray,200, 255,THRESH_BINARY_INV); //Threshold the gray
    imshow("gray",gray);int largest_area=0;
    int largest_contour_index=0;
    Rect bounding_rect;
    vector<vector<Point>> contours; // Vector for storing contour
    vector<Vec4i> hierarchy;
    findContours( gray, contours, hierarchy,CV_RETR_CCOMP, CV_CHAIN_APPROX_SIMPLE );
    // iterate through each contour.
    for( int i = 0; i< contours.size(); i++ )
    {
        //  Find the area of contour
        double a=contourArea( contours[i],false); 
        if(a>largest_area){
            largest_area=a;cout<<i<<" area  "<<a<<endl;
            // Store the index of largest contour
            largest_contour_index=i;               
            // Find the bounding rectangle for biggest contour
            bounding_rect=boundingRect(contours[i]);
        }
    }
    Scalar color( 255,255,255);  // color of the contour in the
    //Draw the contour and rectangle
    drawContours( src, contours,largest_contour_index, color, CV_FILLED,8,hierarchy);
    rectangle(src, bounding_rect,  Scalar(0,255,0),2, 8,0);
    namedWindow( "Display window", CV_WINDOW_AUTOSIZE );
    imshow( "Display window", src );    
    waitKey(0);                                         
    return 0;
} 

-------------

Result:


Sources:
http://docs.opencv.org/doc/tutorials/imgproc/shapedescriptors/find_contours/find_contours.html
http://harismoonamkunnu.blogspot.in/2013/06/opencv-find-biggest-contour-using-c.html